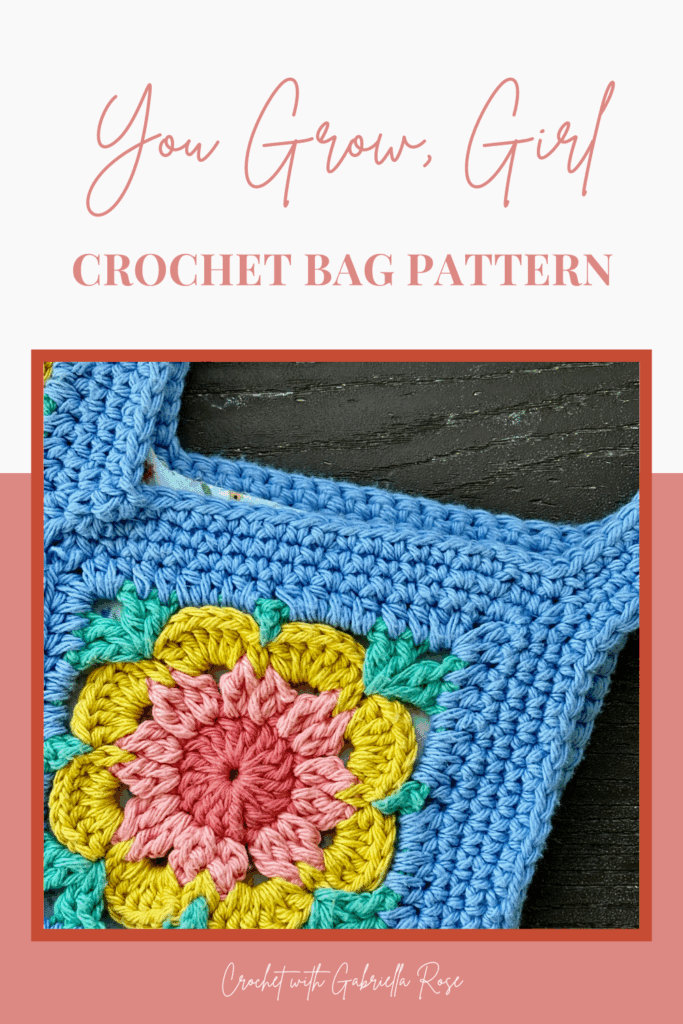

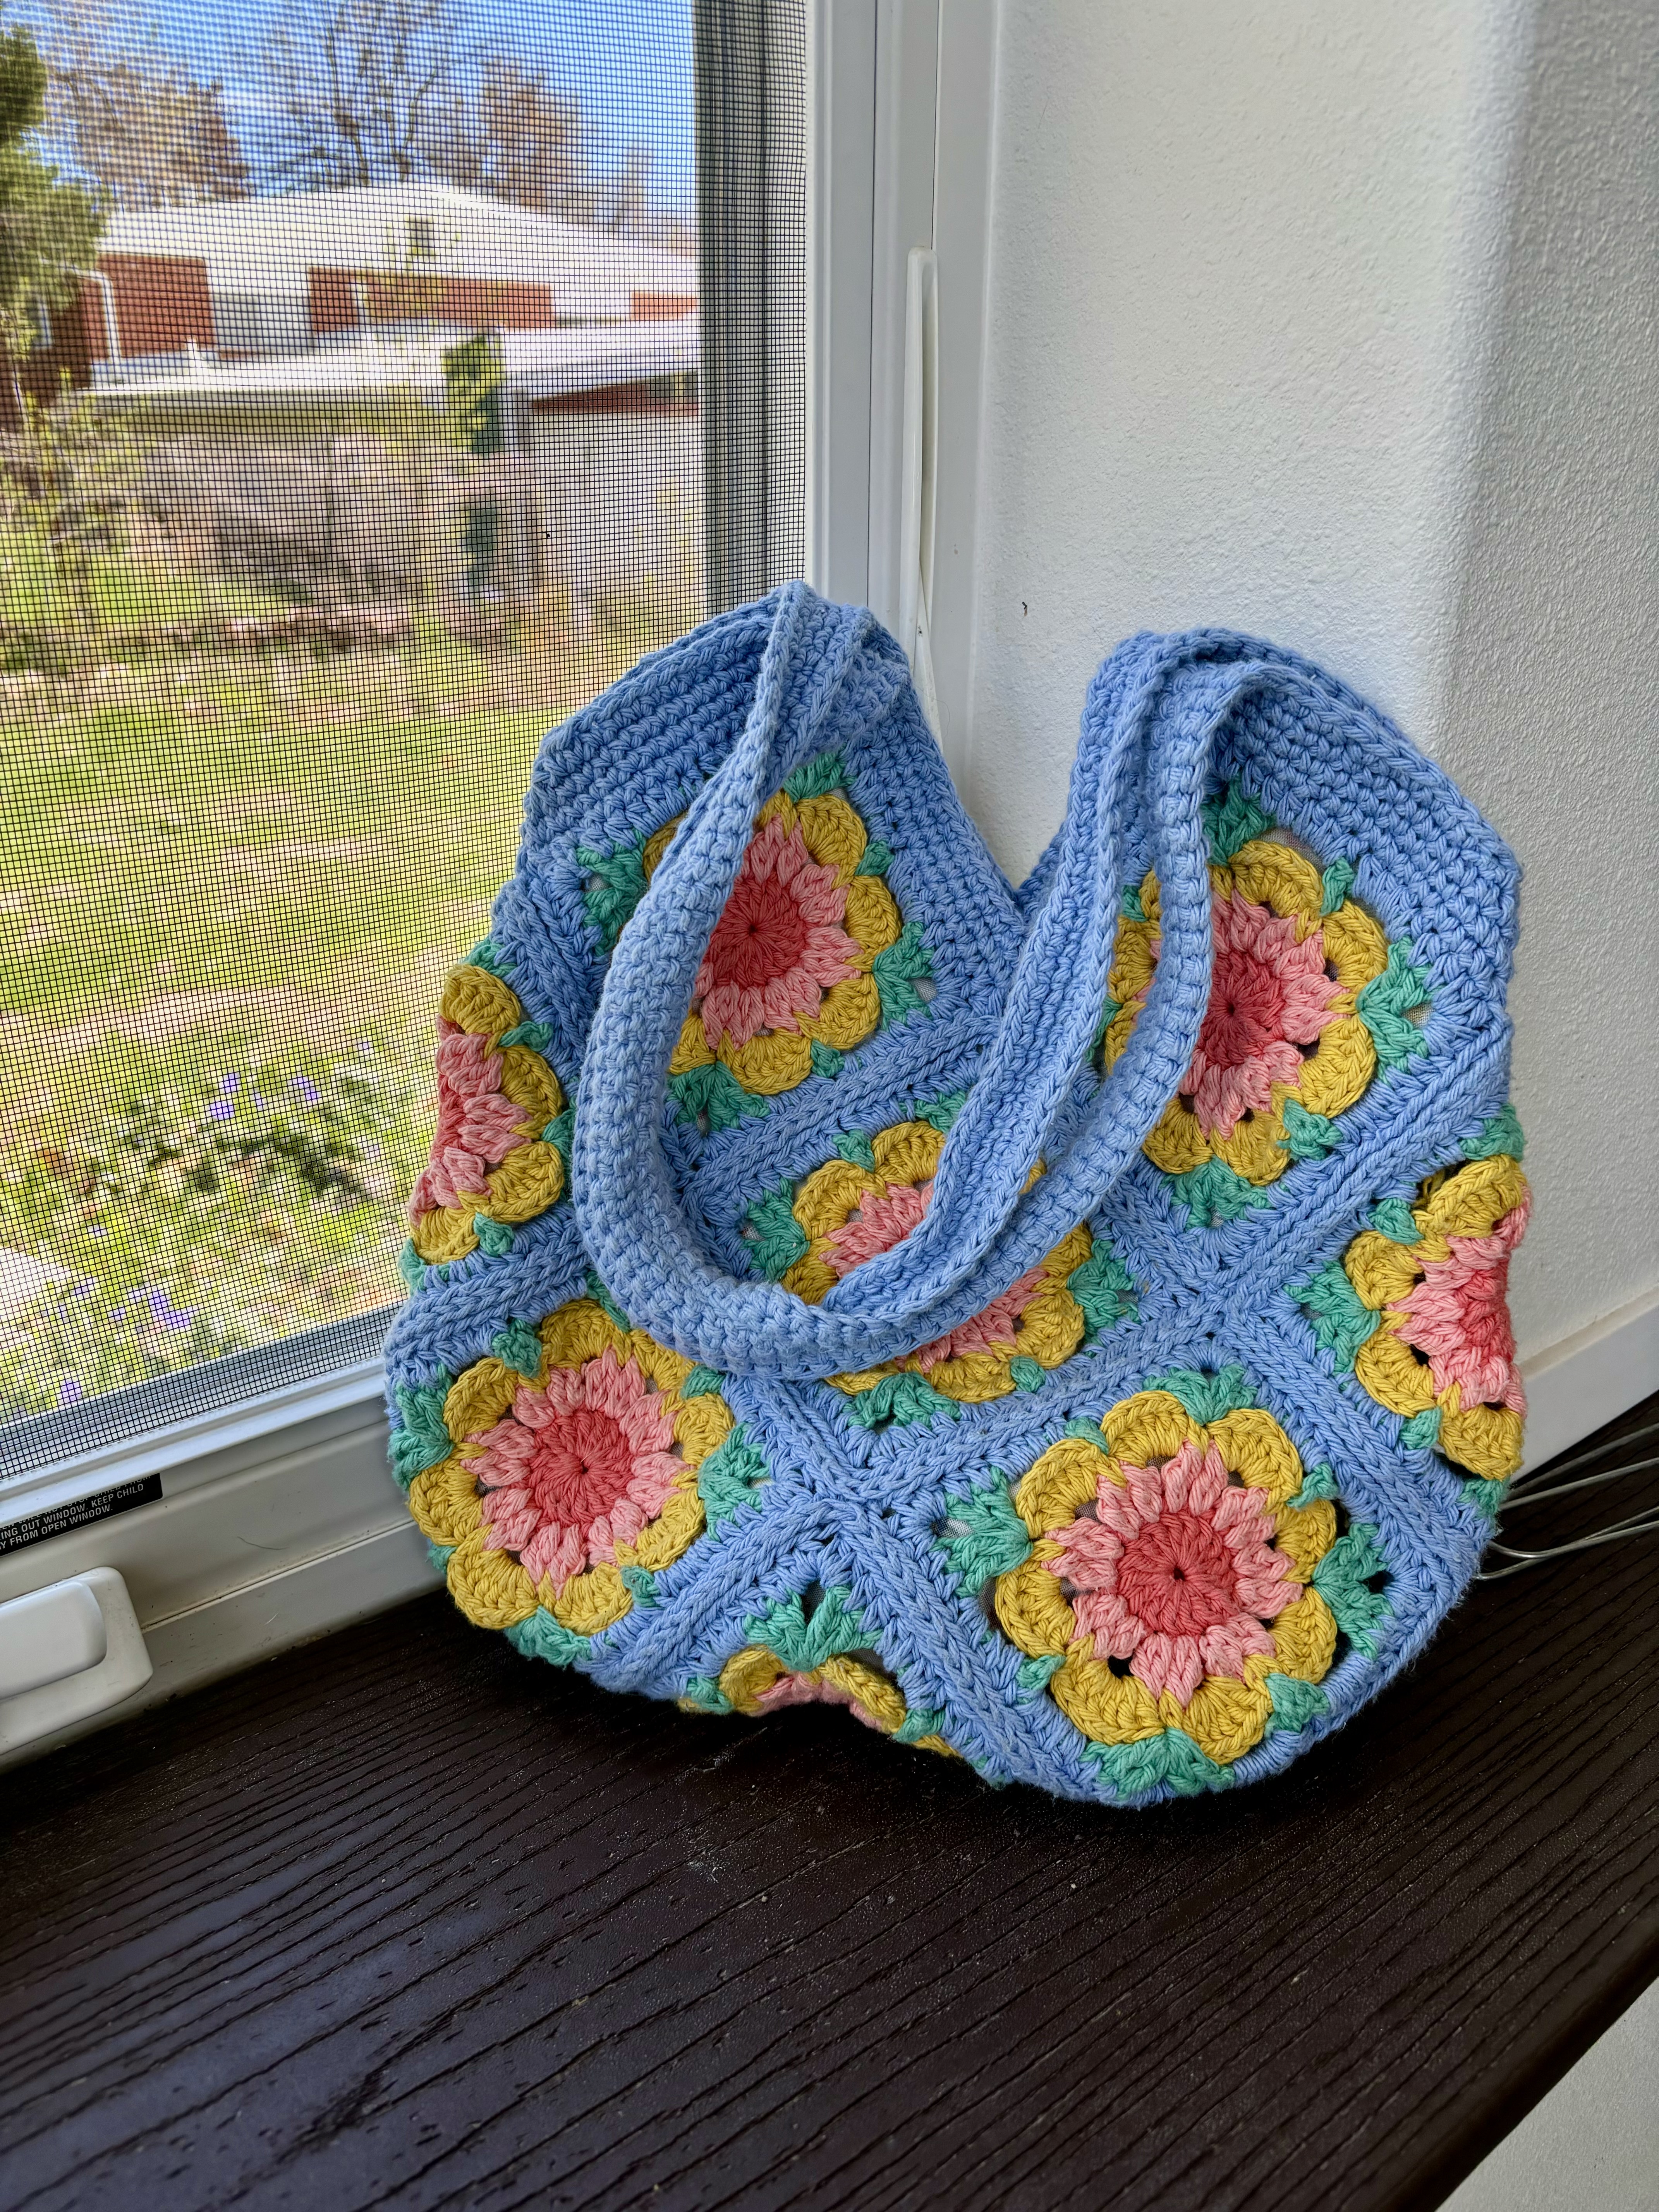
You Grow, Girl – A Crochet Granny Square Bag
She is here! The crochet bag you didn’t know you needed, but now you KNOW you do! She’s gorgeous, she’s fun, and loves a day out strolling the town!
Get Ad-free PDF Crochet Pattern here!
This post contains affiliate links, which means I receive a small commission, at no extra cost to you, if you make a purchase using that link. Please see my disclosure for more details.
The Design
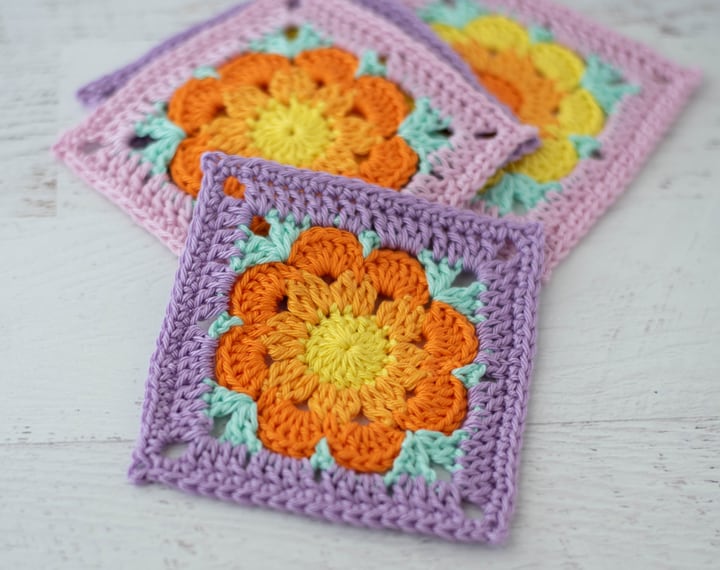
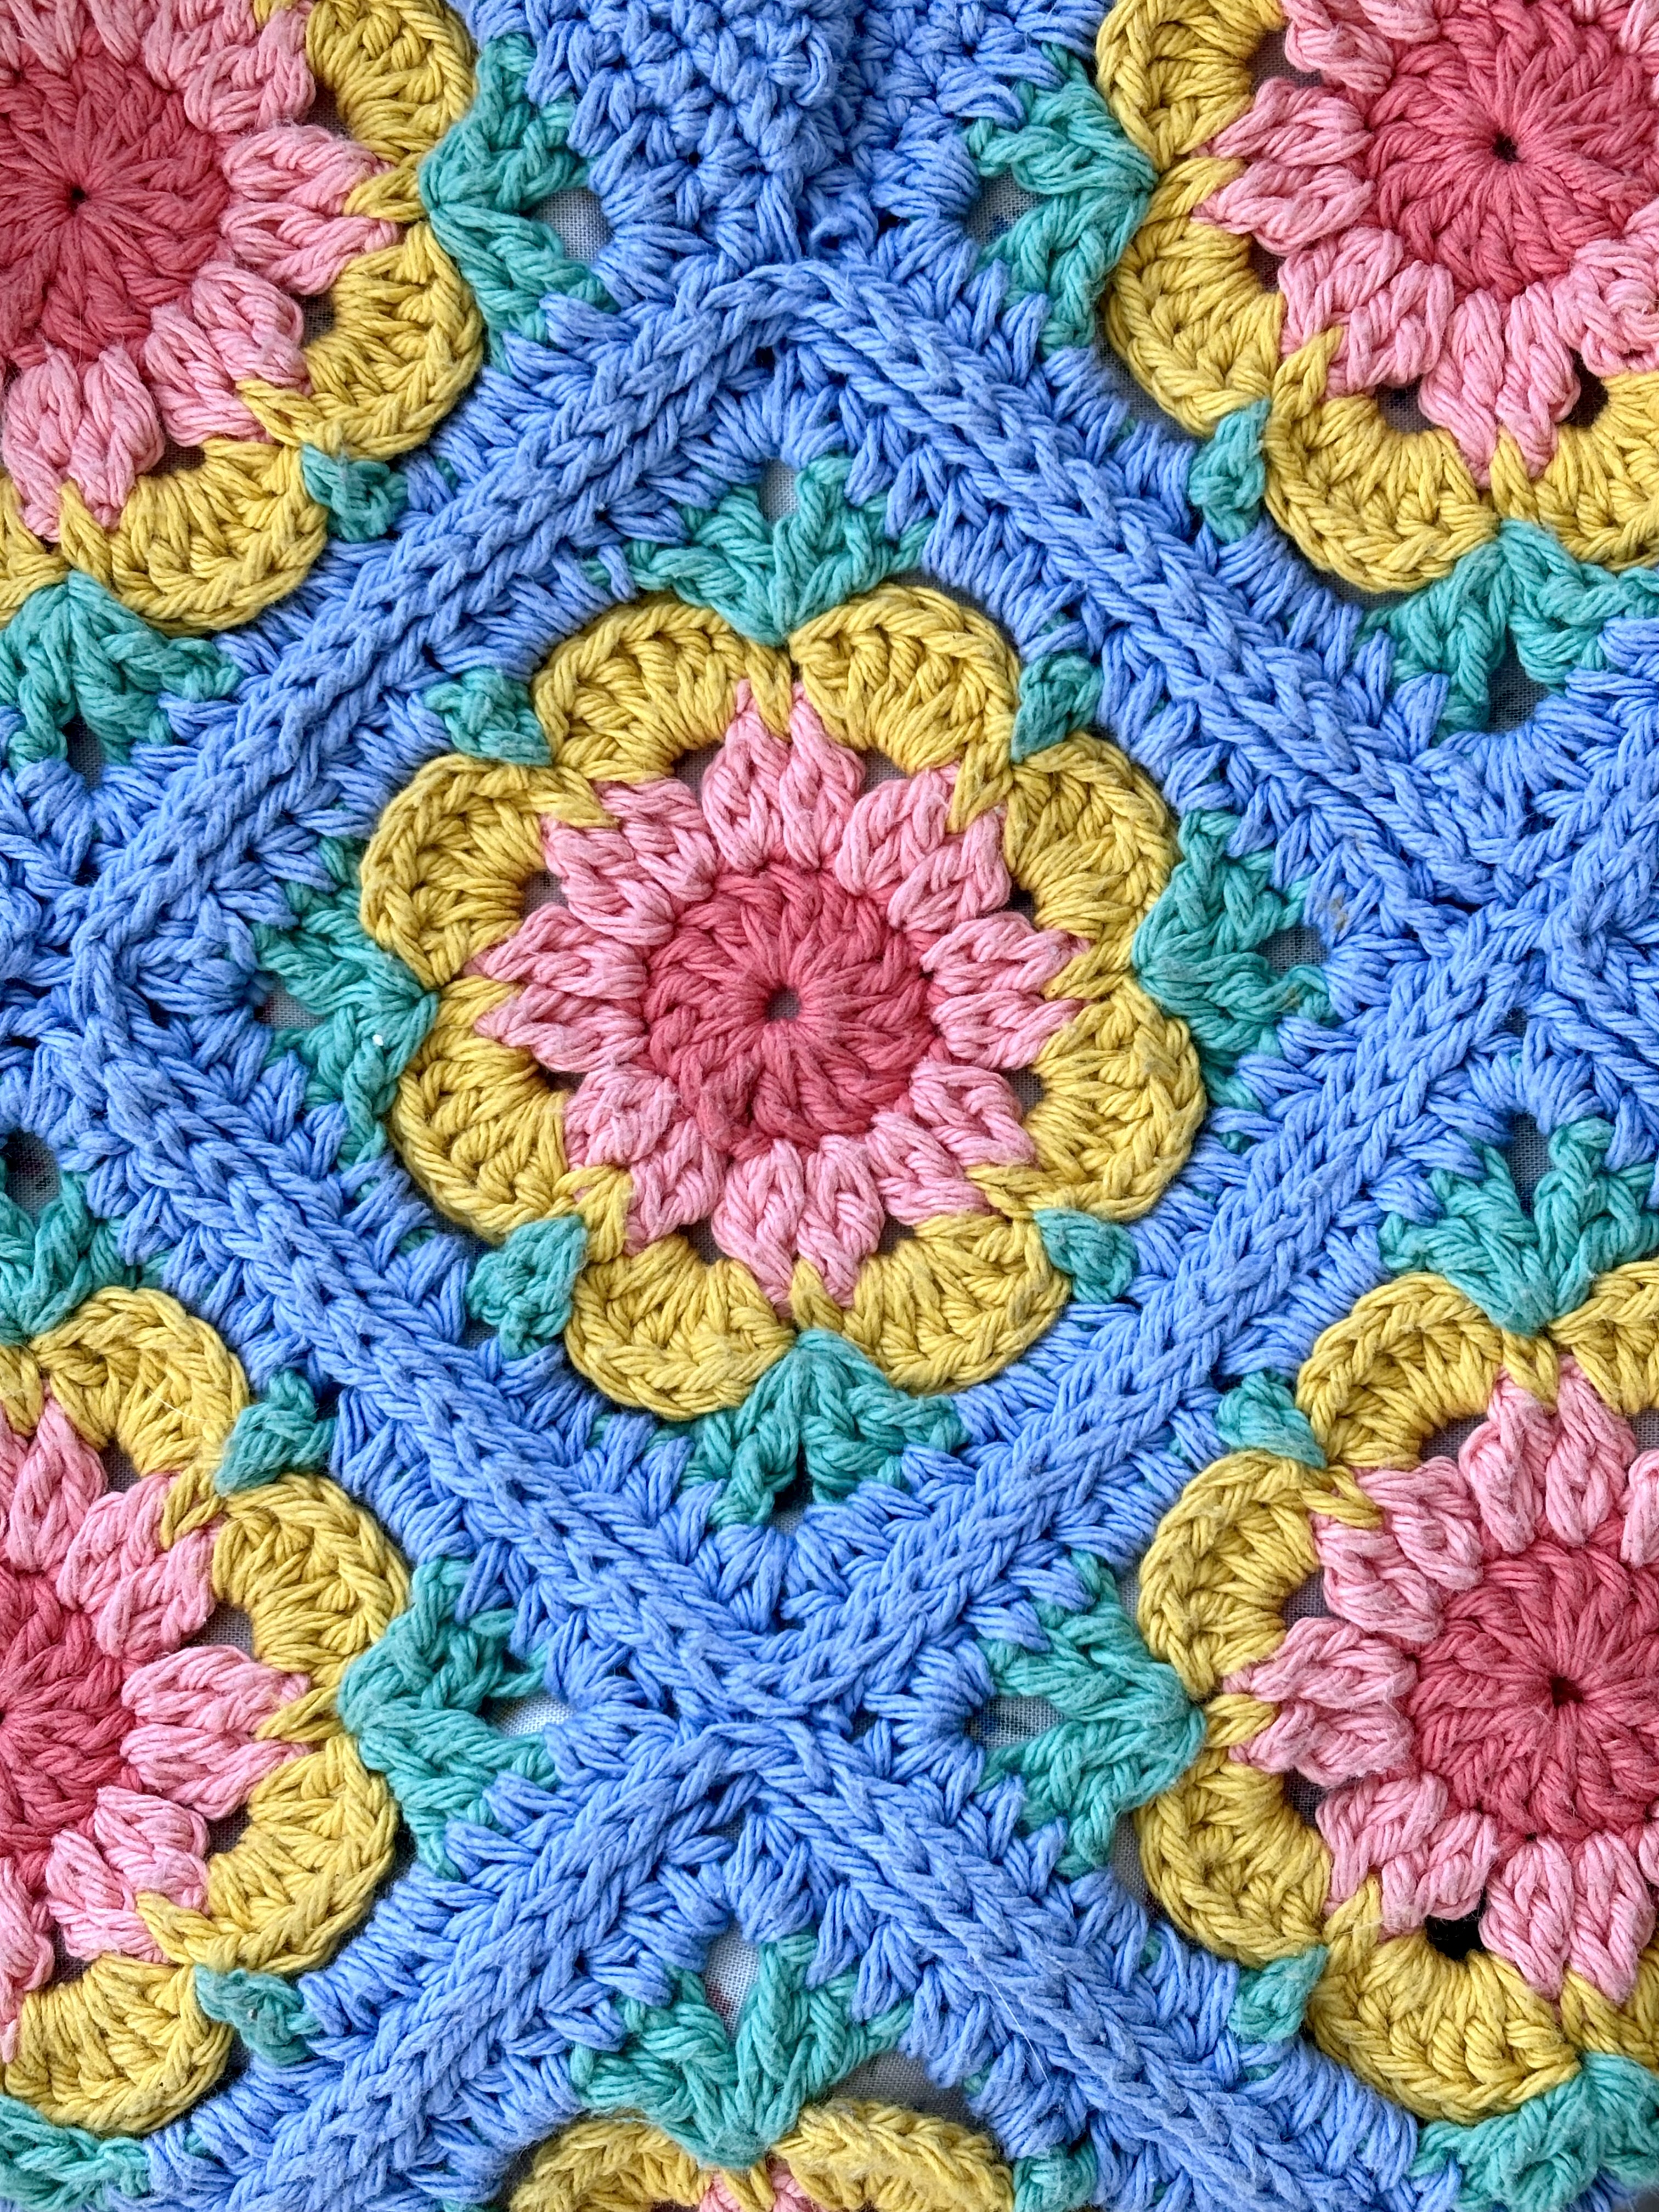
If you’ve been here before, you’ve probably seen my A Cup of Sunshine Coasters from awhile back, but if you haven’t they are one of my favorite granny square variations! I love how there is a perfect spot for a leaf color to be added in. I actually first used this design for an afghan blanket that I also love, but I thought… why stop there?
I recently moved this past year near my family in Indiana and found the cutest little shop near my house! Somehow, I was lucky enough to find this shop right when they were losing their fiber artist, so now I’ve been making a few crochet items here and there to sell at this adorable shop! It’s been so fun, but I’ve been itching to get back to designing and bringing you some amazing crochet patterns!
I’m so excited to show you my You Grow Girl crochet bag! I actually made this particular crochet bag for my niece and she cannot get enough of it, but I’ve made a few more that are going to be for sale in the HomeCraft shop in Huntington, Indiana if you are local and want to stop by! But enough chit chat, let’s get started!
Get Ad-free PDF Crochet Pattern here!
Materials
- US E-4 / 3.50mm Crochet Hook (Clover Amour is my favorite!)
- Loops & Threads Classic Cotton Yarn
- 35 yards of Coral
- 37 yards of Salmon
- 46 yards of Banana
- 46 yards of Bright Jade
- 200 yards of Vista
- Tapestry Needle for weaving in ends (Susie Bates is a LIFESAVER!)
I’ve also really enjoyed using I Love This Cotton Yarn for this crochet bag design, so if you’re more of a Hobby Lobby person or a die-hard Michael’s fan, either cotton yarn works great!
Special Stitches
Cluster Stitch: Yarn over hook, insert hook into the next stitch, draw a loop through, yarn over hook, draw a loop through two of the loops on the hook. Two loops remain. Then, yarn over, insert hook into the same stitch, draw a loop through, yarn over, draw a loop through two loops. Three loops remain on hook. Finally, yarn over and draw through all three loops. Cluster stitch made.
Starting Cluster Stitch: Ch 2, yarn over, insert hook into the next stitch, draw a loop through, yarn over, draw a loop through two loops. Three loops remain on hook. Yarn over and draw through all three loops. Starting cluster stitch made.
Squares (Make 13)
First Color (center)
Make a magic ring.
R1: Ch 3 (counts as first dc) and work 15 dc into ring. Sl st into top of ch 3. Fasten off first color.
Second Color (small petals)
R2: Join 2nd color to any dc. Make starting cluster stitch as follows: Ch 2, yarn over, insert hook into the same stitch as joining, draw a loop through, yarn over, draw a loop through two loops. Three loops remain on hook. Yarn over and draw through all three loops. (Starting Cluster Stitch made) Work Cluster Stitch (see special stitches) in the next stitch, ch 2. *Work a Cluster Stitch in each of the next 2 stitches, ch 2. Repeat from * around. Sl st into top of starting ch 2. Fasten off second color.
Third Color (large petals)
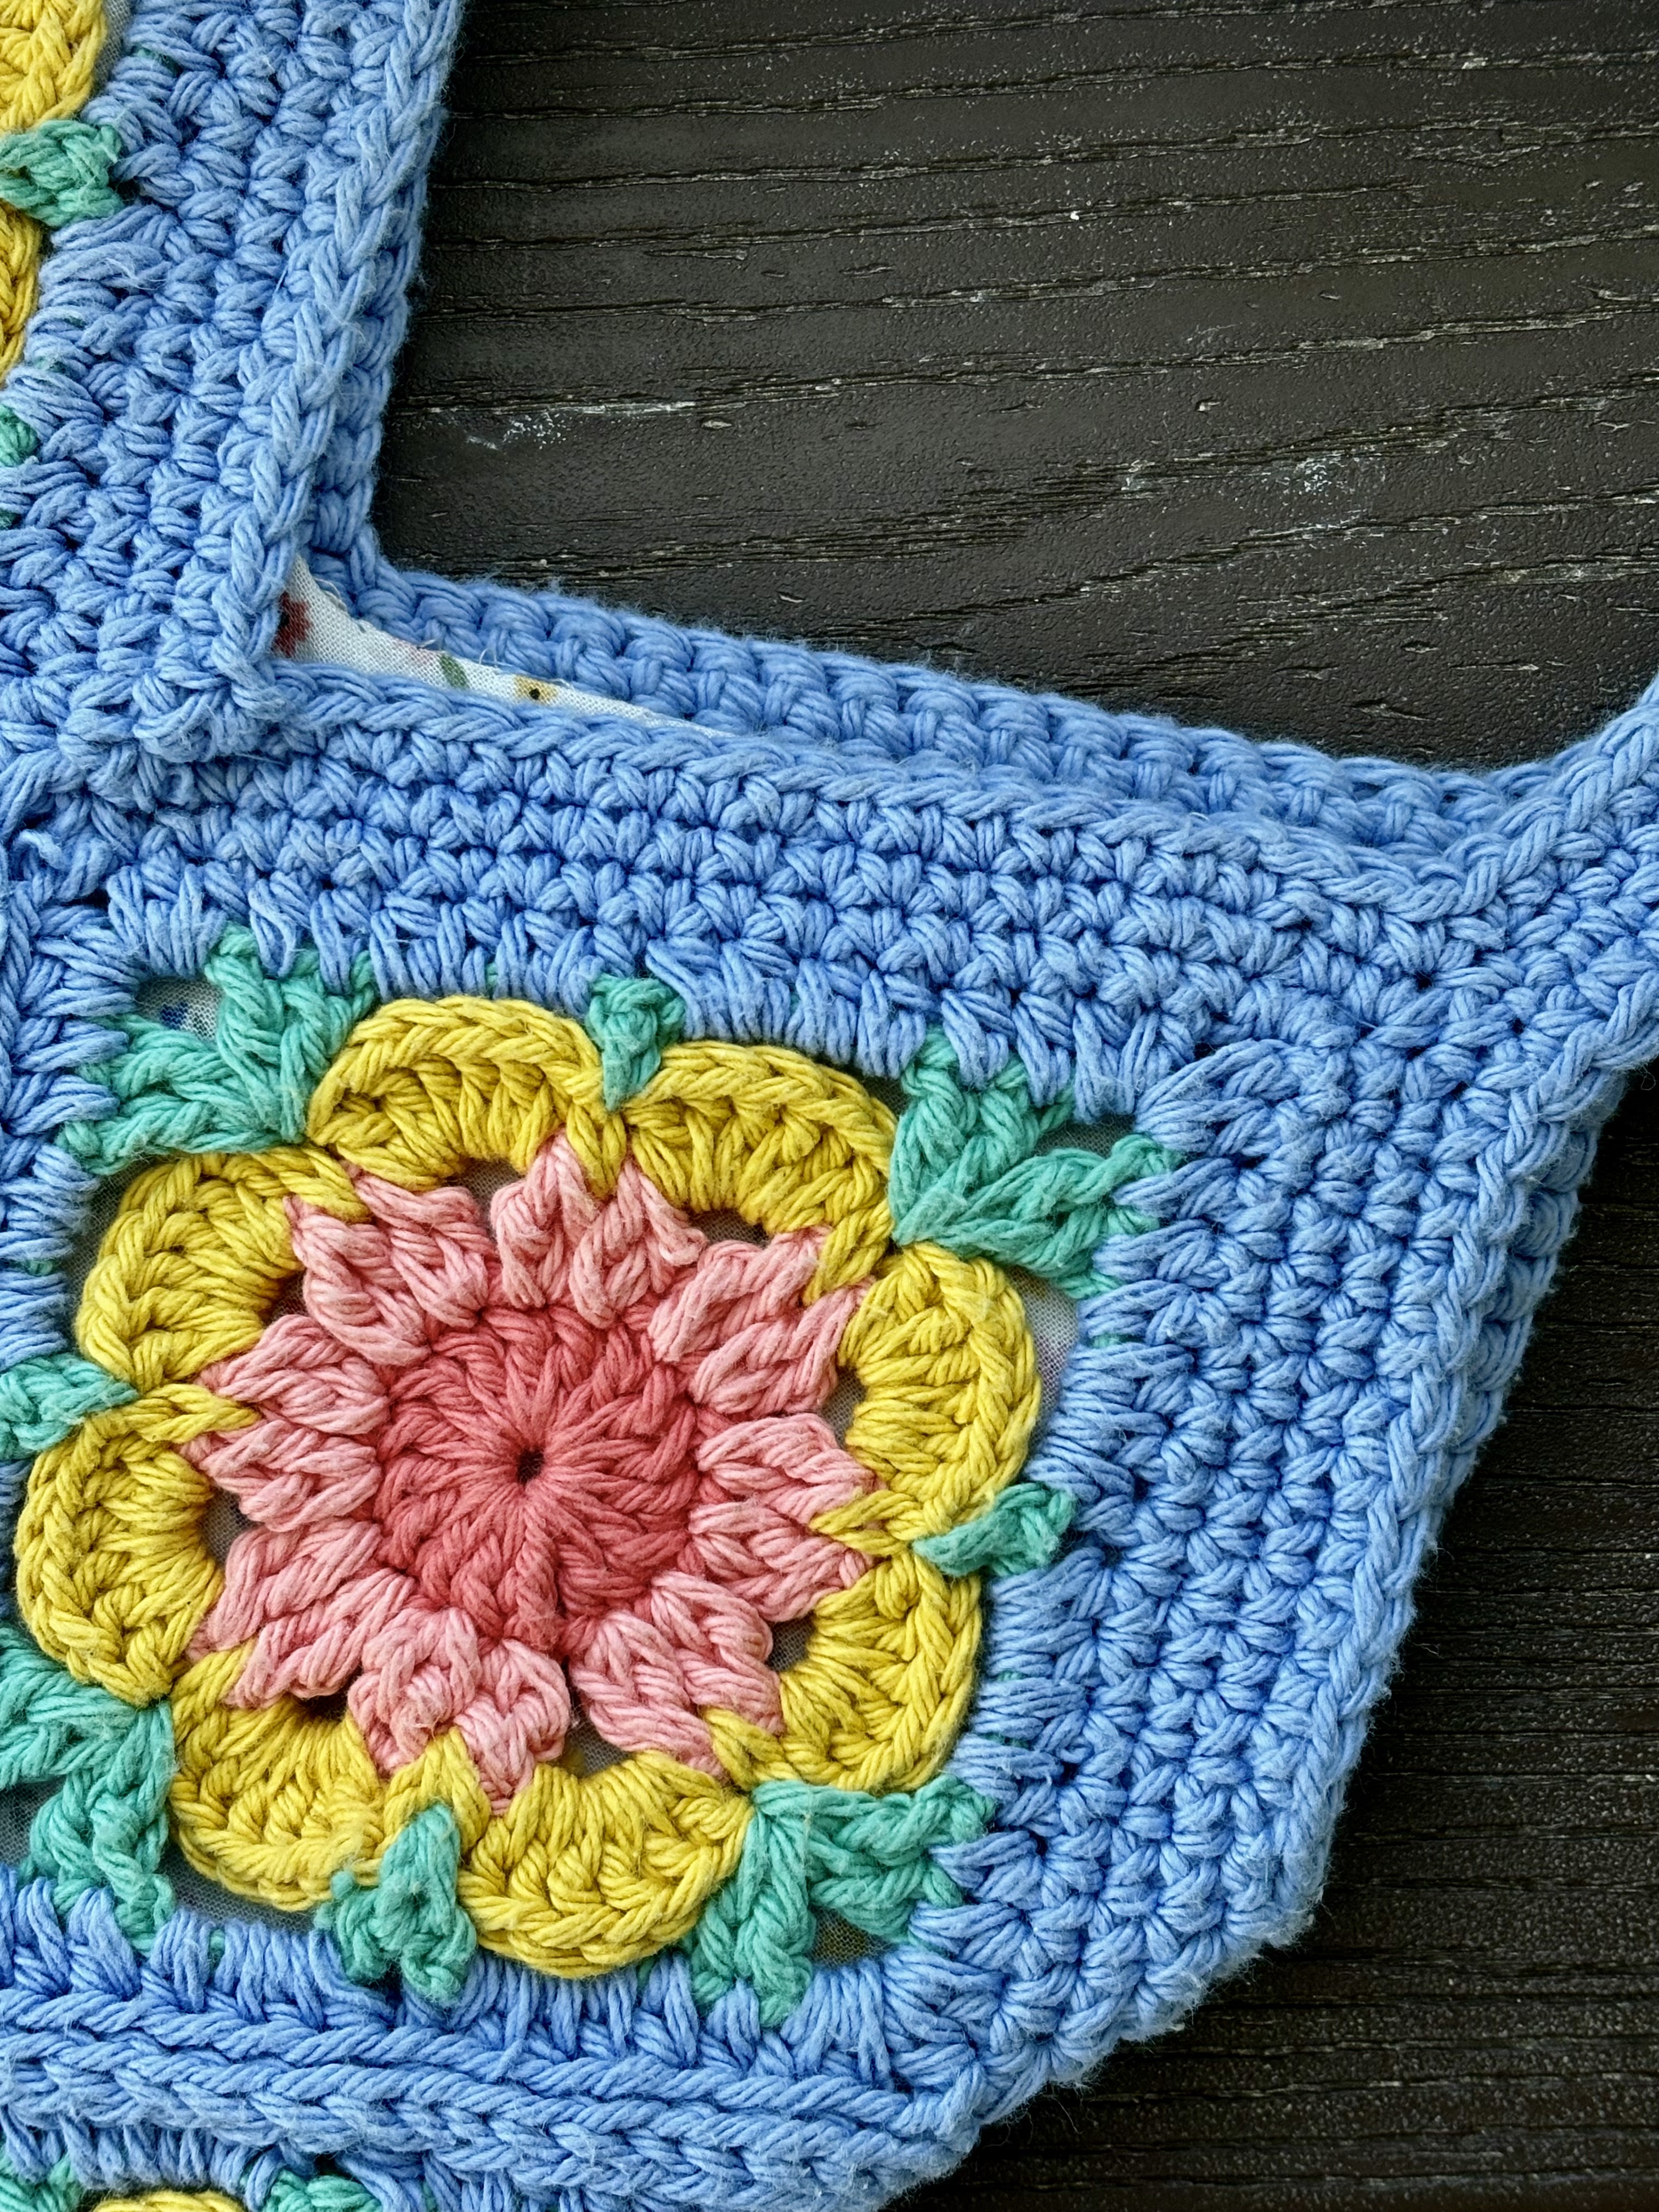
R3: Join 3rd color in the center of a petal from previous round (between the cluster stitches). Ch 1 and sc in same space as joining. Work 6 dc in next ch-2 space. *sc between the 2 cluster stitches of the next petal, 6 dc in the next ch-2 space. Repeat from * around. Sl st into top of first sc. Fasten off third color.
Fourth Color (leaves)
R4: Join 4th color in a sc from prior round. Ch1 and sc in the same stitch as joining, ch 4, (2dc, ch3, 2dc) in the next sc. ch 4, *sc in the next sc, ch 4, (2dc, ch3, 2dc) in the next sc. ch 4 Repeat from * around. Slip stitch into top of starting sc. Fasten off fourth color.
Fifth Color (border)
R5: Attach 5th color in any corner space. Ch2 (counts as 1st hdc), 1hdc, ch2, 2hdc (First corner made), *hdc in next 2 stitches. 4hdc in next ch-4 space, 4hdc in next ch-4 space, hdc in next 2 stitches. 2hdc, ch2, 2hdc (corner made). Repeat from * around. Join with a slip stitch to top of starting ch2.
R6: Ch 1 and sc in same space, work *sc in each stitch until corner space. In corner work (sc, ch2, sl st into 2nd ch to form picot, sc). Repeat from * around. Join with slip stitch to top of starting sc. Fasten off and weave in all ends.
Assembly
Using the diagram below, place down your thirteen crochet squares and we can start putting them together! I find the quickest way to assemble these is using just a simple whip stitch, but if you want to achieve that braided look around each square, that will require a slip stitch assembly.
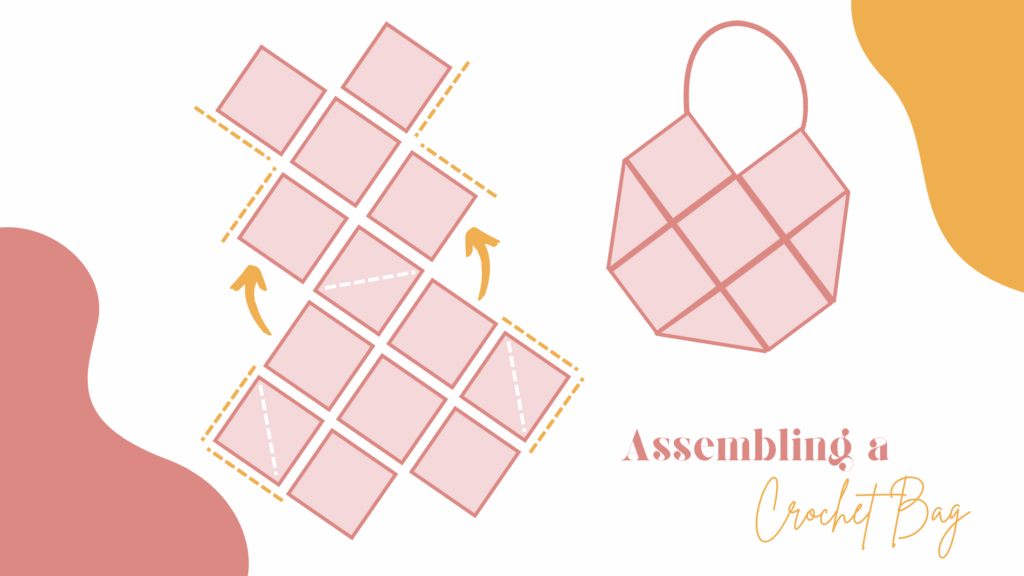
Slip Stitch Assembly
Holding the corner of two squares, insert your hook into the first square’s top stitch, continue by inserting your hook into the second square’s top stitch, yarn over and pull up through all loops. One slip stitch made. Repeat until all squares have been assembled.
I like to snake my way through the squares, starting between the two bottom squares, working a zig-zag up between the top two squares, and working zig-zig back down to my start. This will attach all but those ones on each side of the wider area near the bottom, so I’ll do this method again on either side, starting at those squares, and zig-zagging again to assemble the sides of the crochet bag.
Bag Handles
Still with me? Yay! So my favorite way of explaining these next steps I got from the wonderful Cheryl from Crochet 365 Knit Too. She likes to the top of your crochet bag where it dips down in the middle and sides your “valleys” and the tops where your straps will go the “peaks”! I like decreasing in my valleys to flatten out my crochet bag a bit, but it all comes down to every person’s preference and yarn tension.
R1: Insert your hook in the middle of the top left square. Ch1, 1sc in each st, with 1dec in the valleys and 2sc in the peaks. Sl st into the top of your first sc.
R2: Ch1, 1sc in each st, with a dec3tog in each valley. *At your first peak, 1sc and ch70. Being careful not to twist your ch, 1sc into your next peak, skipping over your middle valley area. Continue 1sc in each st with 1dec3tog in your valleys. Repeat from * for your next peak. Sl st into the top of your first sc at the end of your row.
R3: Continuing on the outside of the straps going around the bag, ch1 and 1sc into each st, including 1sc into each st in the chains we created. You may continue decreasing in your valleys. Sl st into the top of your first sc at the end of your row.
R4: Ch1, 1sc in each st around the bag. You may continue to decrease in your valleys. Sl st into the top of your first sc at the end of your row. Fasten off.
We are now working inside the inner area of the straps. R5 and 6 will need to be done for each side of the crochet bag.
R5: Inserting your yarn into the middle of either squares, ch1, 1sc into each st or ch around. 1dec in the valley. Sl st into the top of your first sc at the end of your row.
R6: Ch1, 1sc around. 1dec3tog in the valley. Sl st into the top of your first sc at the end of your row. Fasten off.
Totally optional, but I love lining my bags! It does a great job lessening the stress on your crochet, reducing the yarn’s stretch and making your crochet bag last longer! If you would be interested in me making a tutorial on how to line your own crochet bag, please comment below!
Conclusion
Thank you for coming along with me on this super fun adventure! I bet your You Grow Girl crochet bag looks absolutely amazing! Want to make more? Check out my Etsy and Ravelry shops! If you are looking for some crochet hooks to use, Clover Amour is my favorite! Not sure if Clover Amour is for you? I have a Clover Amour review post that offers some great cheap alternatives!
Where do YOU like to get your yarn? Comment below your favorite shop!
I love seeing your finished crochet projects! If you enjoyed making one of my patterns I’d love to see it on Instagram! Make sure to tag me @crochetwithgabriellarose. If you are more of a Facebook person, check out the Crochet with Gabriella Rose Facebook page for notifications of new blog posts and crochet patterns!